iOS WebSocket Dictation
Introduction
Using nVoq's API from iOS is just as straightforward as other platforms. This HowTo is intended to illustrate not only our WebSocket API, but some iOS/Xcode specific topics as well. Brief introductions to capturing audio from the microphone and encoding the audio as Ogg Vorbis are provided in the process of demonstrating the WebSocket functionality.This discussion assumes you already know how to build iOS applicaitons with Xcode and Swift, Objective-C, etc.
Before You Begin
API User Account
If your organization has not already been in contact with our Sales team, please complete this short form on the Developer Registration Page and we will reach out to you regarding a user account and access to our APIs. Once you have an account, you must change your password before the account can be used for API calls.Audio Format
The nVoq API supports ogg Vorbis and PCM encoded audio sampled at 16kHz. For more information on Audio Formats, click hereNote: the best audio processing performance is when audio chunks are about 300ms long.
External Dependecies
Recent versions of Xcode and Swift provide all the functionality necessary to perform WebSocket dictations with PCM (wav) audio. However, compressed audio formats make more efficient use of resources and often provide a better overall user experience due to bandwidth and latency constraints. The preferred encoding for the nVoq dictation service is Ogg Vorbis, but WebM or MPEG-4 work well and may be better supported in some environments. Recognition accuacy is excellent and the audio can be four to five times smaller than uncompressed PCM. The libraries supporting this codec from Xiph can be compiled into frameworks for building iOS applications in Xcode. Specifically, the Ogg and Vorbis libraries will be discussed in more detail later in this tutorial.Some Background Info
If you are new to iOS development, there are a few concepts that set this environment apart from other development toolsets. Embracing these differences will improve your experience with speech application development for iOS. First of all, Apple provides a full featured, fully integrated development and debugging experience in Xcode and the device simulators. While iOS apps can be built without these tools, it is seriously discouraged. If Apple provides a way to do something, embrace it for the path of least resistance. Next, the Apple APIs make heavy use of the Delegation Pattern. If you are unfamiliar with this design pattern, learn it and learn to love it. It's a key concept and required to handle UI events, incoming audio events, and other asynchronous operations in applications. Lastly, these code samples illustrate the basic concepts. However, to convey the concepts as clearly as possible, rigorous memory management and error handling are NOT included. When you build your own applications, you will need to do this work.App Overview
The following diagram provides a high-level overview of the application components and how they interact with each other.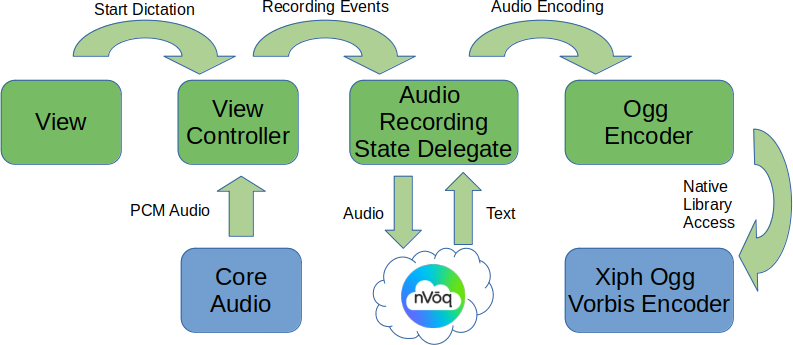
Let's Go!
Download Sample App
Download the iOS Sample Application and unzip it on your Mac.Open Sample App
Fire up Xcode, and open the project you just unzipped. The Xcode project file can be found inUNZIP_DIRECTORY/Websocket/Websocket.xcodeproj
Edit Credentials
In Xcode, openDictationHelper.swift and replace YOUR_USERNAME with your actual username and YOUR_PASSWORD with your actual password.
Build and Run the Application
Then, run the application inside Xcode. It should build and run the app in the iOS simulator. You may be prompted to allow microphone access. If so, reply "yes". Once the app has launched, Click "Record" at the bottom of the screen. This opens a WebSocket connection to nVoq's dictation service and, if authenticated, streams audio from your microphone to the service, changes the button label to "Stop", and displays the returned text as it is received from the server. When you are done dictating, click "Stop" at the bottom of the screen.Code Walkthrough
What just happened? Having a working sample application is nice. But, let's look into the details to develop an understanding of the primary components of a working dictation client application.Press Record Button
When you click on "Record" in the user interface,ViewController.buttonClicked() is called, which in turn calls ViewController.startDictation(). ViewController.startDictation() calls ViewController.startAudioListening(). This is where it starts to get interesting.
Microphone Audio
ViewController.startAudioListening() creates an instance of DictationHelper, starts audio streaming from the microphone and notifies the instance of DictationHelper that audio is coming by invoking DictationHelper.onAudioRecordingStart(). The sample application requests 16 bit 16 kHz PCM audio for a high quality recording. But we will compress the audio (see below) to save on bandwidth and, in many cases, improve accuracy.
Start Dictation
So, inDictationHelper.onAudioRecordingStart(), a WebSocket connection is opened to the service by calling the DictationHelper.connect() method, an ogg/Vorbis encoder is created, and DictationHelper.sendStartDictation() is invoked. This is the beginning of interaction with the nVoq API. DictationHelper.sendStartDictation() creates the JSON encoded start dictation message and sends it over the open WebSocket connection.
Halftime
At this point, we have started a stream of audio, opened a WebSocket connection to the dictation service, and asked the dictation service to start a dictation. Assuming these operations succeed, there are two things to be done:- Receive the incoming audio from the microphone, encode it as ogg, and send it to the service over the WebSocket connection
- Receive the incoming text from the dictation service and display it on the screen
Audio Encoding/Upload
First, let's discuss the audio handling. As part of requesting audio,ViewController.startAudioListening() creates a queu into which the arriving audio will be placed. It also registers the function audioQueueInputCallback() to be notified when audio is equeued. audioQueueInputCallback() then invokes onAudioRecordingData() on the instance of DictationHelper which is an AudioRecorderStateDelegate. DictationHelper.onAudioRecordingData() encodes the audio as ogg and sends it over the WebSocket connection. This continues as long as the dictation is active.
Receiving Text
Now, for the incoming transcript. When the WebSocket connection was opened,DictationHelper.onReceive() is registered as the callback for incoming messages. onReceive() verifies the incoming message and, if the message is successfully received, it is passed to DictationHelper.onMessage() for processing. onMessage then calls ViewController.onTextReceived(). ViewController.swift has an extension at the end of the file making it a DictationHelperDelegate. onTextReceived() sets the text in the text are in the user interface.
Shutting Down
After the last step, audio is flowing from the microphone to the dictation service and text is flowing from the dictation service back to the user interface. When you press the "Stop" button, similar to the "Start" button, the event works its way through theViewConroller, stopping audio recording, and over to DictationHelper.sendAudioDone(). This method creates a JSON encoded AUDIODONE message and sends it over the WebSocket to the dictation service, indicating the client has finished sending audio for this dictation. When the dictation service finishes transcribing the audio and has sent all the text back to the client, it sends a message indicating the text is done. Inside this JSON encoded message will be the string - "textDone":true. When the sample app receives this message, it closes the WebSocket connection and waits to start another dictation.
Congratulations! You now have a running iOS dictation application and an understanding of the implementation. For complete documentation for the nVoq dictation API, see our online documentation here.
Extra Credit: Ogg Vorbis Encoding
The sample app contains pre-built frameworks for the open source Ogg Vorbis encode from Xiph.org. If you are interested in building your own framework, or upgrading the framework, these instructions will help you do so. Note that if this library API changes, you may need to make changes to NVOQOggEncoder.h and NVOQOggEncoder.mm.First, download the ogg and vorbis source code in gzipped tar file format (the script below depends on finding .tar.gz files in your Downloads directory) from the links provided here: Then, download this script and run it with the command below. If you put the downloads in a different directory or downloaded different versions of the ogg or vorbis libraries, modify the script to reflect those locations.
sh ./oggvorbis.sh
Project > Add to Project and select the top level framework directory for both the Ogg and Vorbis frameworks.
If you have any questions, please reach out to support@nvoq.com.